
There’s been a lot of talk and no action regarding these gluten-free Brazilian cheese breads. I know I’ve been promising a pao de queijo recipe since January, when I returned from the land of these magical cheese puffs. And you may think I’ve just failed to deliver. But the truth is I’ve been hoarding many a Brazilian delicacy for you, much as I did many a cheesy roll from our Rio breakfast buffet.
Now that the summer games are almost upon us, and I finally rolled out my epic healthy hedonist travel guide to Rio, I’d be remiss in letting you go another day without one of these puppies in your hand.
It didn’t take me long to go into pao de queijo withdrawal when I returned to the States, and I was relieved to discover soon thereafter (while developing a host of Brazilian recipes for Food & Wine), that they are actually quite simple to make. Most of the venues where I inhaled my helping of cheese bread likely whipped theirs together from a mix. For the lazy among you, this is totally an option. (You can find a good one here). But since these puffs are already not necessarily the healthiest, I liked being fully in control of my cheesy destiny.
The star of the show (besides cheese), is sour tapioca flour. You can use regular tapioca flour, but for the most authenticity and easy handling, I’d advise ordering a bag online. The other ingredients are fairly straight forward pantry items: vegetable oil, eggs, milk and Parmesan cheese. (I used almond milk in my first batch since that’s all I had on hand, and it worked just fine.)
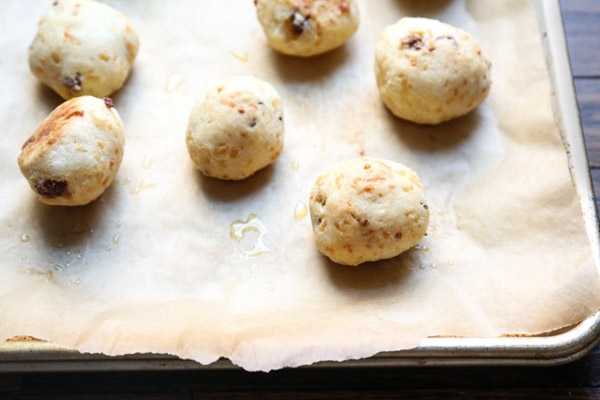
As you know by now, my domestic goddess status is sub-par in the baking department. So the fact that I nailed these Brazilian cheese puffs on the first try, would indicate that they’re pretty difficult to mess up. The first thing to note is that the batter is rather sticky. I found it helpful to use a wooden spoon before switching to greased palms to knead the dough. You may also notice that the sour tapioca flour has kind of a foul smell. Just muscle through all of the above, friends.
Feel free to get creative with mix-ins. This version, which I made for F&W, included some browned sausage in the batter. Cut the finished rolls in half, stuff with a fried egg and you have the world’s best gluten-free Egg McMuffin.
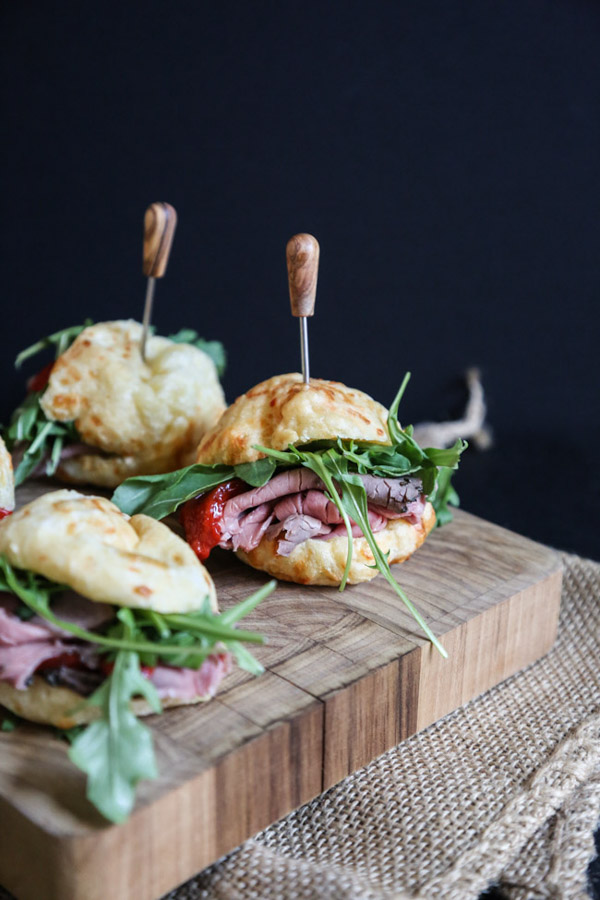 The version below makes two dozen, but you can make them slightly larger (same bake time) and use them as slider rolls. If you’re hosting an Olympics party, I recommend channeling some churrasceria vibes and sandwiching them with some thinly sliced steak (or roast beef) and arugula, like I did in the above.
By the end of next week, I should have a full Brazilian menu for you, along with some other tips for how to make your opening ceremony viewing party a little more wild and colorful (just buy a lot of cachaca). And in the meantime, I’m off on my next travel adventure to the Pacific Northwest! If you any of you have recommendations on where to eat in Portland or Seattle (and anywhere in between) I would love your advice in the comments section. I imagine I will be hoarding oysters much like I did these cheese breads, though I doubt they will fare as well rolled inside a hotel napkin for safe keeping.
Have a wonderful weekend!
From one healthy, cheese bread loving hedonist, to another,
Xoxo
Phoebe
![]()
Pao de Queijo (Brazilian Cheese Breads)

Ingredients
- 1/2 cup water
- 1/2 cup whole milk see note
- 1/2 cup vegetable oil
- 1/2 teaspoon salt
- 2 cups sour tapioca flour
- 2 large eggs
- 1 cup shredded parmesan cheese
Instructions
- Preheat the oven to 400°.
- In a medium saucepan, combine the water, milk, vegetable oil and salt and bring to a simmer. Remove from the heat.
- Place the sour tapioca flour in a large bowl and briskly mix in the hot milk mixture with a wooden spoon until the flour is completely incorporated and a sticky dough forms. When the dough is cool enough to handle, knead it until smooth and just slightly warm.
- Add the eggs one at a time, kneading and then mixing with the wooden spoon until incorporated. Stir in the grated cheese in two additions.
- Using an ice cream scoop and greased hands, shape the dough into 2-tablespoon sized balls and arrange them on 2 parchment paper-lined baking sheets. Bake until puffed and golden, about 20 minutes. Let cool on the sheets for a few minutes before serving.
Yasss! This is one of my all-time fave treats, and more people should know about their magical powers. Thank you for helping spread the word 😉
Right?!? So glad you’re already acquainted!
I was thinking of trying almond milk in other baking recipes, so it’s good to know it worked here. Brilliant to make them as slider buns!
it’s an easy substitute i’ve found!